WebRTC with js-libp2p
Introduction
In this guide, you will learn how to establish direct peer-to-peer (p2p) connections between browsers using js-libp2p and WebRTC.
Browser-to-browser connectivity is the foundation for distributed apps. When combined with GossipSub, like in the universal connectivity chat app, gives you the building blocks for peer-to-peer event-based apps with mesh topologies.
By the end of the guide, you should be familiar with the requisite libp2p and WebRTC protocols and concepts, and how to use them to establish libp2p connections between browsers.
Since js-libp2p runs both in the browser and Node.js with WebRTC being supported in both, what’s covered in this guide also applies to using the WebRTC transport to dial browsers from Node.js.
WebRTC is a set of open standards and Web APIs that enable Web apps to establish direct connectivity for audio/video conferencing and exchanging arbitrary data. Today, WebRTC is adopted by most browsers and powers a lot of popular web conferencing apps.
Both js-libp2p and WebRTC are quite complicated technologies due to the complex nature of peer-to-peer networking, browser standards, and security. In favor of brevity, this guide will skim over some details while linking out to relevant resources.
Why WebRTC & libp2p
WebRTC and libp2p can be used independently of each other. This begs the question, why use the two together? The TL;DR is that they complement each other.
WebRTC’s goal is to enable applications to establish direct connections between their users in the browser, i.e. peer-to-peer “browser-to-browser” connectivity.
Libp2p gives you the tools to build interoperable cross-platform peer-to-peer applications with mesh topologies that work both on the web and as stand-alone binaries.
Direct connections are especially useful for video and audio calling, because they allow traffic, i.e. the packets, to flow directly from one peer to another without an additional network hop to a server that may be geographically far (network latency is still bound to distances and the speed of light).
However, the reality of public internet networking given routers, NAT layers, VPNs, and firewalls is such p2p connectivity is riddled with challenges. These challenges are commonly overcome by running additional infrastructure such as signaling, STUN, and TURN servers, some of which are standardized as part of WebRTC.
While WebRTC is a solution to peer-to-peer connectivity in the context of browsers. Libp2p encompasses a wider scope with building blocks for building peer-to-peer apps that support WebRTC in addition to other transports, such as QUIC, TCP, WebSocket, WebTransport, and essentially form a mesh topology:
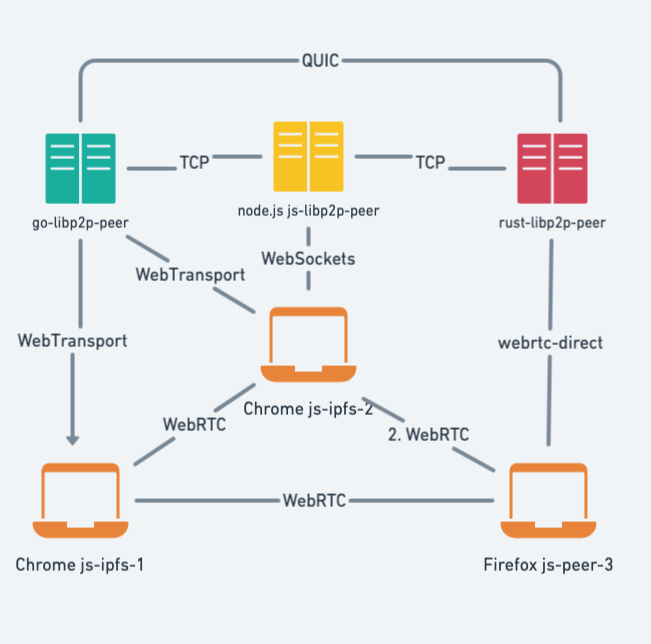
Another benefit of WebRTC and libp2p is that it allows you to dial a js-libp2p peer in the browser from a js-libp2p in Node.js.
The diagram above illustrates a mesh topology with libp2p, whereby each peer is identified by a Peer ID that is derived from a public key. When you create a new peer libp2p will first create a new public-private key pair, unless you provide one. Each Peer can have multiple addresses depending on the transport protocols it can be dialed with, e.g. WebRTC in the browser, which can also change.
Peer-to-peer connections: when two aren’t enough to tango
Perhaps the most important thing to note about WebRTC and the connection flow is that you need additional server(s) to establish a direct connection between two browsers. The role of these servers is to assist the two browsers in discovering their public IP address so that they can set up a direct connection.
Specifically, these include:
- STUN server: helps the browser discover its observed public address and is necessary in almost all cases, due to NAT making it hard for a browser to know its observed public IP. There are many free public STUN servers that you can use.
- TURN (Relay) server: relays traffic if the browsers fail to establish a direct connection and is defined as part of the WebRTC specification. Unlike signaling and STUN servers can be costly to run because they route all traffic between peers. This guide will not use TURN servers. Instead, it will lean on GossipSub to ensure delivery of messages when direct connections cannot be established.
- signaling: helps the browsers exchange SDP (Session Description Protocol) messages: the metadata necessary to establish a connection. Most importantly, signaling is not part of the WebRTC specification. This means that applications are free to implement signaling as they see fit. In this guide, you will use Libp2p’s protocol for signaling over Circuit Relay v2 connections.
- Libp2p relay: The libp2p peer will serve two roles:
- Circuit Relay V2: A publicly reachable libp2p peer that can serve as a relay between browser nodes that have yet to establish a direct connection between each other. Unlike TURN servers, which are WebRTC-specific and can be costly to run, Circuit Relay V2 is a libp2p protocol that is resource-constrained by design. It’s also decentralized and trustless, in the sense that any publicly reachable libp2p peer supporting the protocol can help browsers libp2p nodes as a (time and bandwidth-constrained) relay.
- PubSub Peer Discovery: For browser peers to discover each other, they will need some mechanism to announce their multiaddresses to other browsers. GossipSub is a PubSub implementation that will help by relaying those peer discovery messages between browsers which kick off the direct connection establishment. Note that this approach to peer discovery is not very scalable and probably not fit for production use cases.
In summary, as part of this guide, you will need to run a publicly reachable long-running libp2p peer that will serve as both a circuit relay and a GossipSub message relay. This guide will refer to the libp2p peer as the relay or bootstrapper peer depending on the context.
Connection flow diagram
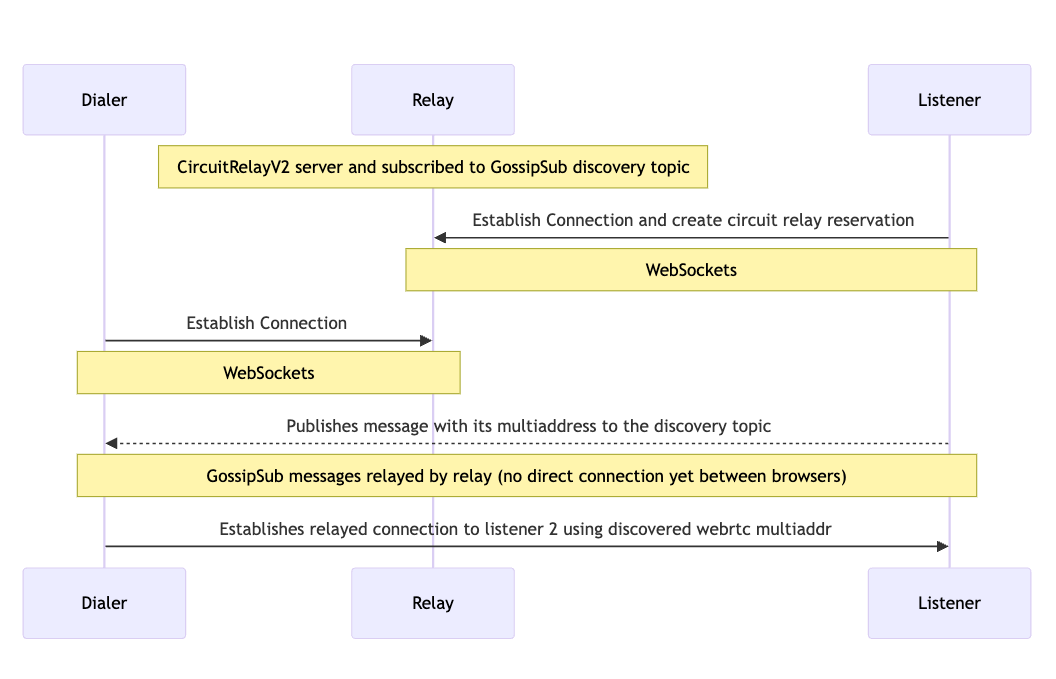
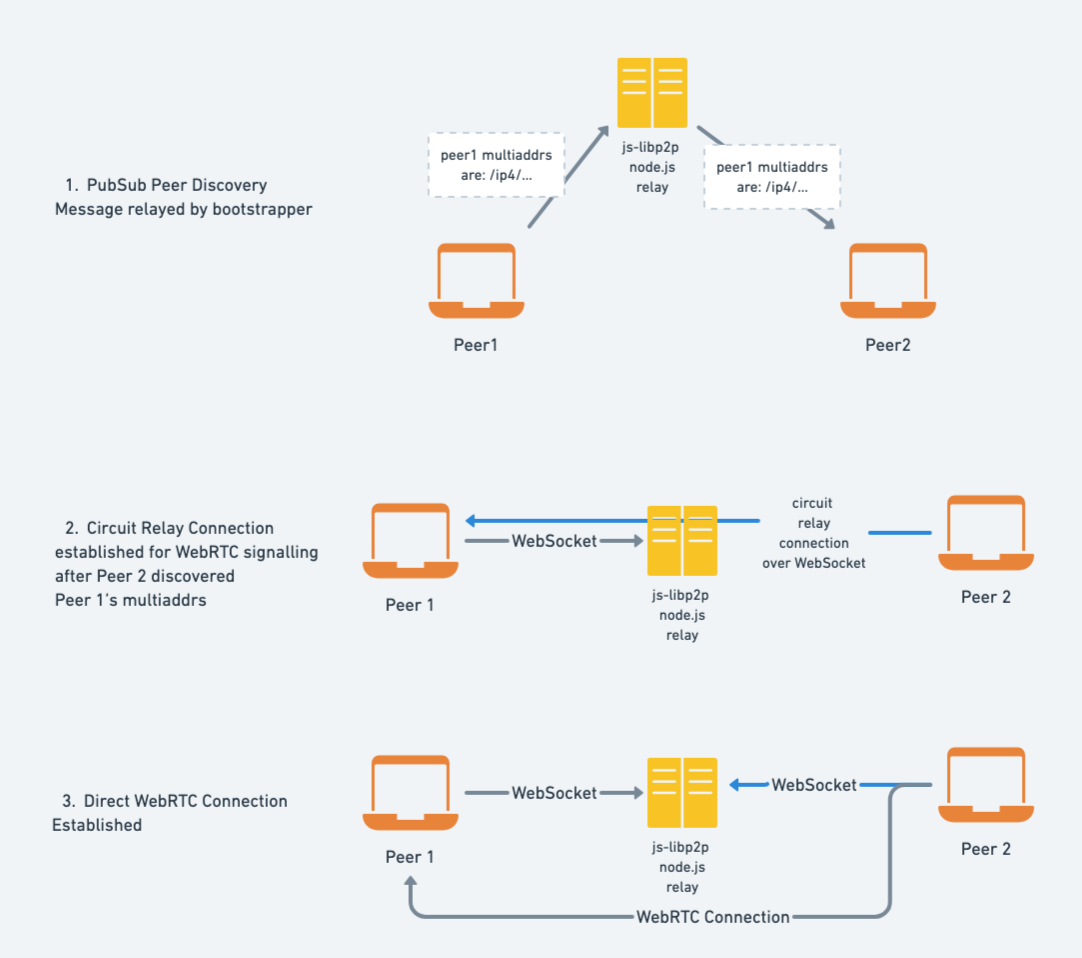
The following diagrams visualize the connection flow between two browsers using js-libp2p and WebRTC.
The first part illustrates the peer discovery and establishment of a relayed connection between the two browsers:
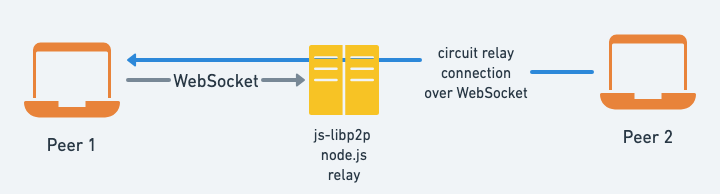
The second part illustrates the SDP handshake via the Circuit Relay:
The connection flow can seem complex, but thankfully, libp2p abstracts some of that complexity, and whatever isn’t will be explained in this guide.
Either way, there are several noteworthy things about the connection flow:
- There’s no prescribed mechanism in libp2p for how the two browsers discover each other’s multiaddress. This guide will use a dedicated GossipSub channel for the application where you publish your own multiaddrs (periodically) similar to mdns, other approaches include the Rendezvous Protocol and the in-progress ambient peer discovery spec.
- Since this guide uses a GossipSub channel for peer discovery, the relay node will listen to the discovery topic too, so that it can relay messages between browsers who’ve yet to establish a direct connection.
Pre-requisites
- Node.js installed to build the frontend and to run the relay
- Chrome or Firefox, for WebTransport connectivity to the relay (Safari does not support WebTransport)
This guide assumes a basic understanding of libp2p concepts such as:
Besides that, most of this guide will focus on js-libp2p, i.e. JavaScript.
Step 1: Clone the repository and install dependencies
Clone the repository:
git clone https://github.com/libp2p/libp2p-browser-guide
Once the repository is cloned, enter the libp2p-browser-guide folder, and install the npm dependencies
cd libp2p-browser-guide
npm install
Step 2: Start the js-libp2p node.js relay
In this step, you will start node.js relay.
Run the following command:
npm run start:relay
It will also output the PeerID and the multiaddrs it’s listening on and should look similar to:
PeerID:  12D3KooWQtCgYCZ7JZQoe7Ao6KP5CDMnmEiURqMoarfBgJwbnCPQ
Multiaddrs:  [
  Multiaddr(/ip4/127.0.0.1/tcp/9001/ws/p2p/12D3KooWQtCgYCZ7JZQoe7Ao6KP5CDMnmEiURqMoarfBgJwbnCPQ),
  Multiaddr(/ip4/192.168.3.174/tcp/9001/ws/p2p/12D3KooWQtCgYCZ7JZQoe7Ao6KP5CDMnmEiURqMoarfBgJwbnCPQ),
  Multiaddr(/ip4/127.0.0.1/tcp/9002/p2p/12D3KooWQtCgYCZ7JZQoe7Ao6KP5CDMnmEiURqMoarfBgJwbnCPQ),
  Multiaddr(/ip4/192.168.3.174/tcp/9002/p2p/12D3KooWQtCgYCZ7JZQoe7Ao6KP5CDMnmEiURqMoarfBgJwbnCPQ)
]
Step 3: Start the js-libp2p peer in the browser
In this step, you will start the js-libp2p peer in the browser and learn about how to configure js-libp2p to establish a connection to the relay.
Start by opening the src/index.js file in your code editor and find the call to createLibp2p:
const libp2p = await createLibp2p({
  transports: [
    // Allow all WebSocket connections inclusing without TLS
    webSockets({ filter: filters.all }),
    webTransport(),
    webRTC({
      rtcConfiguration: {
        iceServers: [
          {
            // STUN servers help the browser discover its own public IPs
            urls: [
              "stun:stun.l.google.com:19302",
              "stun:global.stun.twilio.com:3478",
            ],
          },
        ],
      },
    }),
  ],
  connectionEncryption: [noise()],
  streamMuxers: [yamux()],
  connectionGater: {
    // Allow private addresses for local testing
    denyDialMultiaddr: async () => false,
  },
  services: {
    identify: identify(),
  },
});
The createLibp2p invocation creates a libp2p peer which has its own associated key pair and Peer ID with support for the WebSocket , WebTransport and WebRTC transports, as well as the identify protocol. It also uses noise for to ensure that all connections are encrypted, and yamux as the stream multiplexer for the relayed connection.
This is the minimal configuration needed to establish a connection to the local relay. In the next step, you will use the frontend to connect to the relay.
Why is yamux needed?
You may notice that the above js-libp2p configuration adds yamux as the stream multiplexer. While both WebRTC and WebTransport come with native stream multiplexing, yamux is still needed for WebSockets and to multiplex the circuit relay connection.
When a browser initiates the connection to another browser over a circuit relay, the underlying WebSocket stream to the relay is multiplexed by yamux and encrypted by Noise. In the case of WebTransport it is multiplexed and encrypted natively. Either way, the relayed connection between the two browsers needs to be encrypted by noise, otherwise, the relay could eavesdrop on all the traffic. Once the relayed connection between the browsers is encrypted, it also needs yamux to create a stream for the signaling protocol.
Step 4: Connect to the relay from the browser
In this step, you will connect the browser js-libp2p peer to the node.js relay peer.
In a new terminal window, open the repository cloned in the previous step:
cd libp2p-browser-guide
Run the following command to start the frontend development server:
npm run start
You should see the address of the local development server:
> Local: http://127.0.0.1:8000/
Now open the URL in your browser and enter the loopback webtransport multiaddr of the relay, i.e. /ip4/127.0.0.1/tcp/9001/ws/p2p/12D3KooWQtCgYCZ7JZQoe7Ao6KP5CDMnmEiURqMoarfBgJwbnCPQ
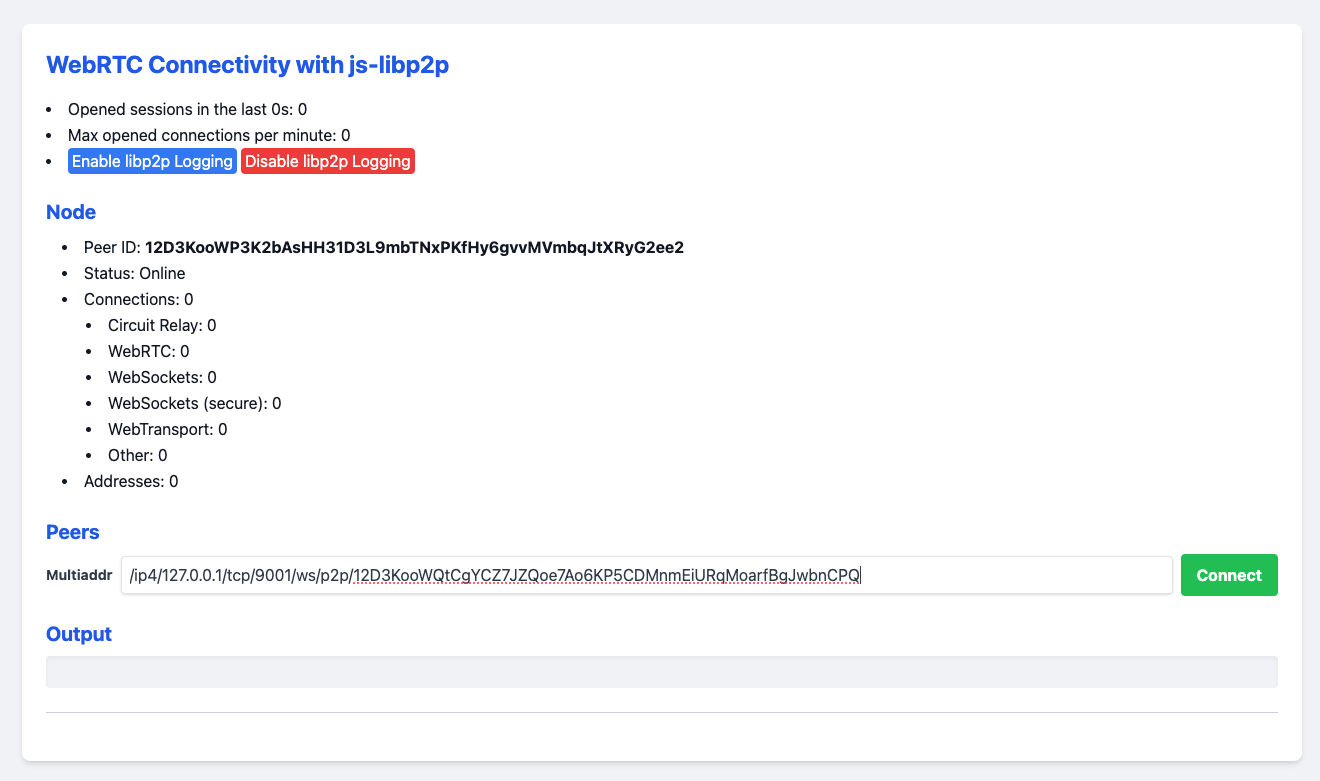
Now click Connect and you should see the peer appearing in the peer List:

Congratulations, you have now established a WebTransport connection to the relay.
Step 5: Make the browser dialable with Circuit Relay
In this step, you will enable the circuit relay transport to make the browser dialable via the relay (that already has circuit relay enabled and will serve as the relay).
In the src/index.js file, update the call to createLibp2p as follows:
+import { circuitRelayTransport } from '@libp2p/circuit-relay-v2'

const libp2p = await createLibp2p({
  transports: [
    // Allow all WebSocket connections inclusing without TLS
    webSockets({ filter: filters.all }),
    webTransport(),
    webRTC({
      rtcConfiguration: {
        iceServers: [
          {
            // STUN servers help the browser discover its own public IPs
            urls: ['stun:stun.l.google.com:19302', 'stun:global.stun.twilio.com:3478'],
          },
        ],
      },
    }),
+    circuitRelayTransport({
+      discoverRelays: 1,
+    }),
  ],
  connectionEncryption: [noise()],
  streamMuxers: [yamux()],
  connectionGater: {
    // Allow private addresses for local testing
    denyDialMultiaddr: async () => false,
  },
  services: {
    identify: identify(),
  },
})
If you reload the page and connect to the relay multiaddr, notice that the browser peer now shows an address for itself after connecting to the relay that looks similar to (with different cert hashes and peer IDs):
/ip4/127.0.0.1/tcp/9001/ws/p2p/12D3KooWQtCgYCZ7JZQoe7Ao6KP5CDMnmEiURqMoarfBgJwbnCPQ
Observe that the beginning of the multiaddr is the same as the relay, followed by /p2p-circuit/p2p/BROWSER_PEER_ID. This multiaddr can be used by other browser peers (capable of WebTransport) to connect to the first browser window using the relay:
By adding circuitRelayTransport with the discoverRelays option, js-libp2p was able to create circuit relay reservation (time and bandwidth-constrained) on the relay.
You can test connecting to the browser by copying the relay address, opening a second browser tab and connecting to the circuit relay address (with p2p-circuit). The second browser will connect to two peers, i.e. the relay and the browser.
Step 6: Set the relay in js-libp2p
In this step, you will configure js-libp2p to automatically connect to the relay peer.
Update the src/index.js file as follows, making sure to replace the multiaddr in with the one from your relay:
+import { bootstrap } from '@libp2p/bootstrap'

const libp2p = await createLibp2p({
  transports: [
    // Allow all WebSocket connections inclusing without TLS
    webSockets({ filter: filters.all }),
    webTransport(),
    webRTC({
      rtcConfiguration: {
        iceServers: [
          {
            // STUN servers help the browser discover its own public IPs
            urls: ['stun:stun.l.google.com:19302', 'stun:global.stun.twilio.com:3478'],
          },
        ],
      },
    }),
    circuitRelayTransport({
      discoverRelays: 1,
    }),
  ],
  connectionEncryption: [noise()],
  streamMuxers: [yamux()],
  connectionGater: {
    // Allow private addresses for local testing
    denyDialMultiaddr: async () => false,
  },
+  peerDiscovery: [
+      bootstrap({
+        // replace with your relay multiaddr
+        list: ['/ip4/127.0.0.1/tcp/9001/ws/p2p/12D3KooWQtCgYCZ7JZQoe7Ao6KP5CDMnmEiURqMoarfBgJwbnCPQ'],
+      }),
+  ]
  services: {
    identify: identify(),
  },
})
Reload the page, and you will see the peer connecting to the relay automatically.
Step 7: Listen on WebRTC and establish a direct connection
In this step, you will update the js-libp2p configuration to listen for WebRTC connections.
In the src/index.js file, update the call to createLibp2p as follows:
const libp2p = await createLibp2p({
+  addresses: {
+    listen: [
+      // 👇 Listen for webRTC connections
+      '/webrtc',
+    ],
+  },
  transports: [
    // Allow all WebSocket connections inclusing without TLS
    webSockets({ filter: filters.all }),
    webTransport(),
    webRTC({
      rtcConfiguration: {
        iceServers: [
          {
            // STUN servers help the browser discover its own public IPs
            urls: ['stun:stun.l.google.com:19302', 'stun:global.stun.twilio.com:3478'],
          },
        ],
      },
    }),
    circuitRelayTransport({
      discoverRelays: 1,
    }),
  ],
  connectionEncryption: [noise()],
  streamMuxers: [yamux()],
  connectionGater: {
    // Allow private addresses for local testing
    denyDialMultiaddr: async () => false,
  },
  peerDiscovery: [
      bootstrap({
        // replace with your bootstrapper multiaddr
        list: ['/ip4/127.0.0.1/tcp/9001/ws/p2p/12D3KooWQtCgYCZ7JZQoe7Ao6KP5CDMnmEiURqMoarfBgJwbnCPQ'],
      }),
  ]
  services: {
    identify: identify(),
  },
})
With the change above, libp2p will leverage circuit relays as the signalling channel for WebRTC connections.
Reload the frontend, and once again connect to the relay by copying its ws multiaddr from the terminal.
After connecting to the relay, the frontend will render two multiaddrs (one of which is new):
/ip4/127.0.0.1/udp/9095/quic-v1/webtransport/certhash/cert-hash-redacted/certhash/cert-hash-redacted/p2p/12D3KooWMEZEwzATAoXFbPmb1kgD7p4Ue3jzHGQ8ti2UrsFg11YJ/p2p-circuit/webrtc/p2p/12D3KooWSLQmyYMmWRLS8FaoQGZ6vhXJKaKSrX4BCivJyHFUkLdJ
/ip4/127.0.0.1/udp/9095/quic-v1/webtransport/certhash/cert-hash-redacted/certhash/cert-hash-redacted/p2p/12D3KooWMEZEwzATAoXFbPmb1kgD7p4Ue3jzHGQ8ti2UrsFg11YJ/p2p-circuit/p2p/12D3KooWSLQmyYMmWRLS8FaoQGZ6vhXJKaKSrX4BCivJyHFUkLdJ
The first (and new) multiaddr contains /webrtc/ which you can use in order to establish a direct WebRTC connection between the browsers, while second is a circuit relay multiaddr (like the one in the previous step).
Copy the multiaddr that contains /webrtc/, open another browser window, and paste the multiaddr into the input, and click connect.
Once the connection succeeds, the WebRTC connection count in both browsers should be 1 and you should see the both browsers connected to the bootstrapper as well as the other browser Peer ID:
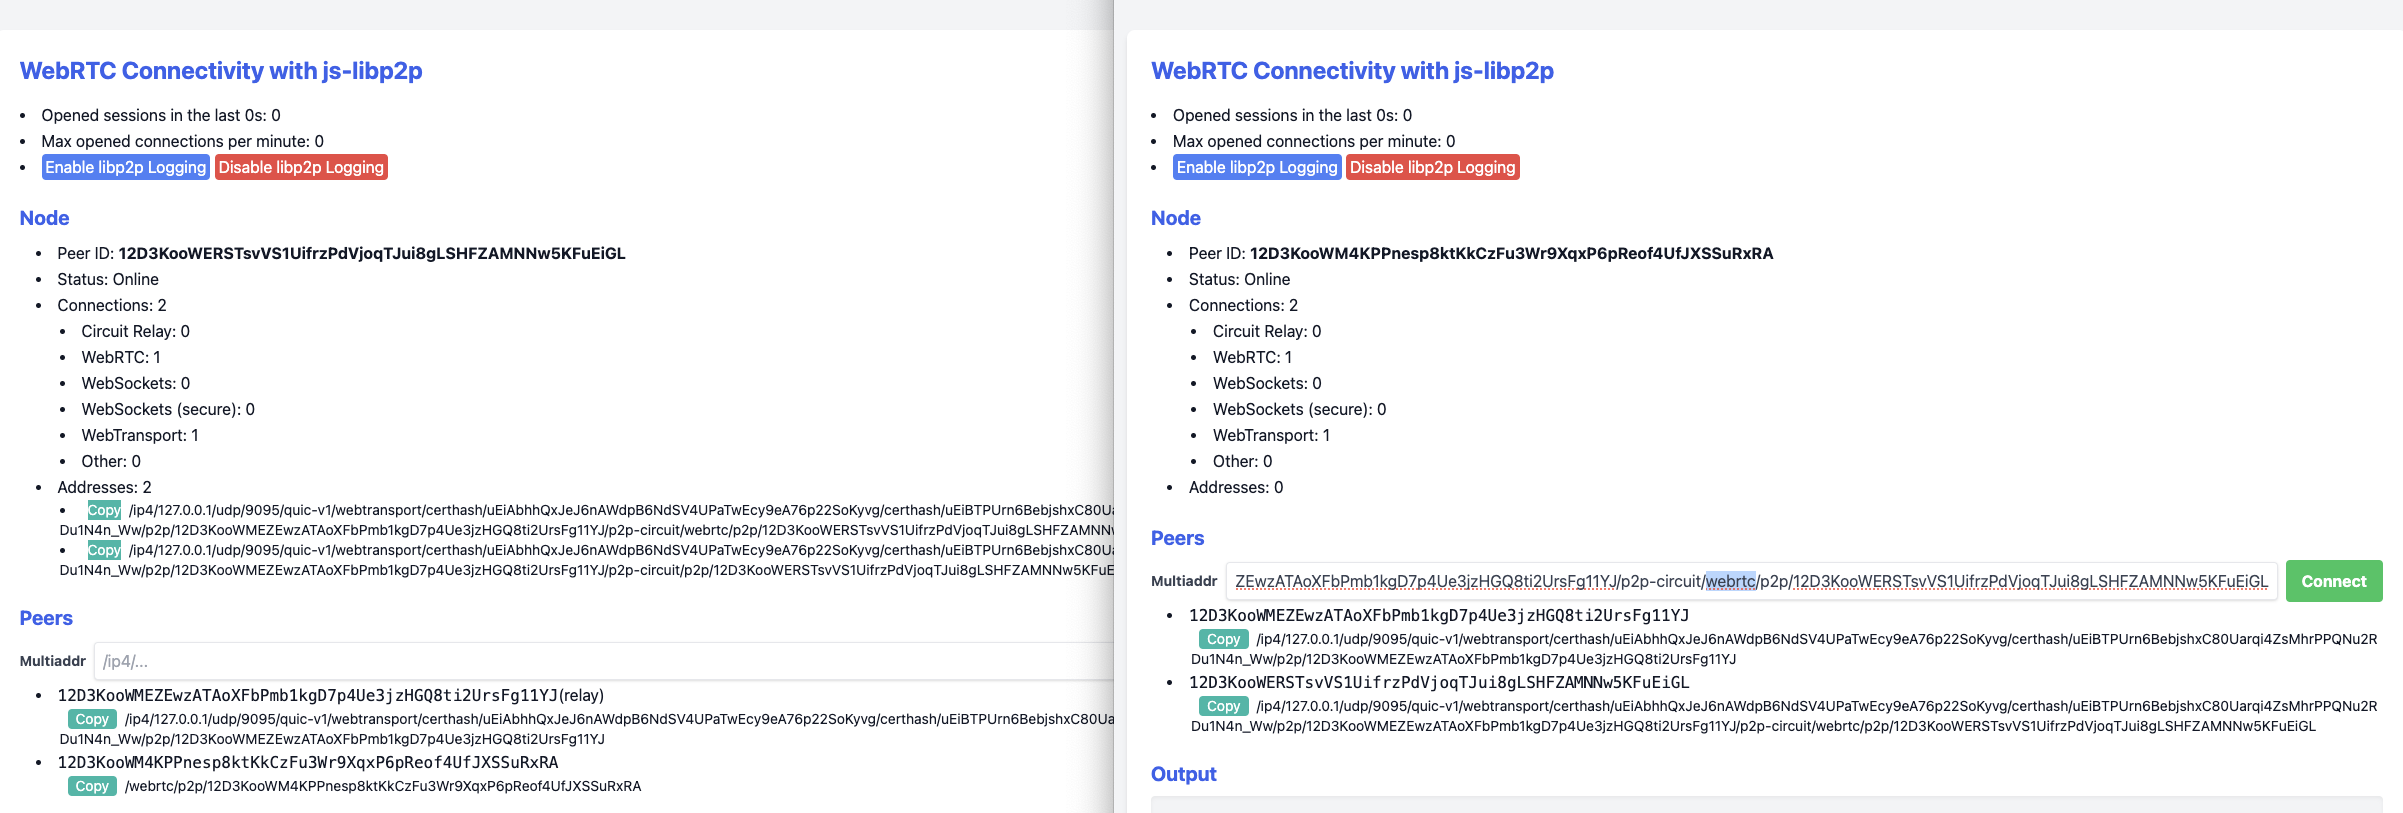
Congratulations! You have successfully established a direct connection between the two browsers.
Exchanging multiaddrs manually is cumbersome and not feasible for real-world applications. To avoid this, you will introduce PubSub-based peer discovery in the next step.
Step 8: PubSub peer discovery
In the previous steps, you worked through the process of establishing a WebRTC connection by manually copying the multiaddrs.
In this step, you will introduce PubSub peer discovery, so that browsers can exchange their multiaddrs and discover each other automatically (with the help of the bootstrapper).
In libp2p, PubSub is implemented with the GossipSub protocol, which provides an efficient way for mesh networks to exchange messages.
For PubSub peer discovery to work, both frontend and the bootstrapper will use the same topic. As soon as the frontend discovers its own multiaddrs, it will publish it in a message to the discovery topic. The bootstrapper, which is also listening to the discovery topic, will gossip the message to other browser peers connected to it, which in turn, can establish direct WebRTC connections. From a high level, it looks as follows:
In the src/index.js file, update the call to createLibp2p as follows:
+import { gossipsub } from '@chainsafe/libp2p-gossipsub'
+import { pubsubPeerDiscovery } from '@libp2p/pubsub-peer-discovery'
+import { PUBSUB_PEER_DISCOVERY } from './constants.js'

const libp2p = await createLibp2p({
  addresses: {
    listen: [
      // 👇 Listen for webRTC connections
      '/webrtc',
    ],
  },
  transports: [
    webTransport(),
    webRTC({
      rtcConfiguration: {
        iceServers: [
          {
            // STUN servers help the browser discover its own public IPs
            urls: ['stun:stun.l.google.com:19302', 'stun:global.stun.twilio.com:3478'],
          },
        ],
      },
    }),
    circuitRelayTransport({
      discoverRelays: 1,
    }),
  ],
  connectionEncryption: [noise()],
  streamMuxers: [yamux()],
  connectionGater: {
    // Allow private addresses for local testing
    denyDialMultiaddr: async () => false,
  },
  peerDiscovery: [
      bootstrap({
        list: ['/ip4/127.0.0.1/udp/9095/quic-v1/webtransport/certhash/...'],
      }),
+      pubsubPeerDiscovery({
+        // Every 10 seconds publish our multiaddrs
+        interval: 10_000,
+        // The topic that the bootstrapper is also subscribed to
+        topics: [PUBSUB_PEER_DISCOVERY],
+      }),
  ],
  services: {
+    pubsub: gossipsub({
+      allowPublishToZeroTopicPeers: true,
+      ignoreDuplicatePublishError: true,
+    }),
    identify: identify(),
  },
})
A couple of note-worthy things about these changes:
- The
pubsubservice adds GossipSub protocol capabilities to the node. pubsubPeerDiscoverydepends on thepubsubservice, and introduces the peer discovery mechanism.- When js-libp2p discovers a new peer (and its multiaddrs), it adds it to the peer store. The connection manager may attempt to dial the newly discovered peer, if the current number of open connections is below the configured minimum. Learn more about the connection manager in the docs.
Next, open two browser tabs of the frontend, and you should see them connecting connected to each other within a couple of seconds 🎉.
Summary
If you have reached this far in the guide, well done! You learned about how to establish browser-to-browser connectivity with libp2p and WebRTC and how libp2p abstracts aspects of WebRTC like signaling and SDP exchange. You also learned about js-libp2p’s configuration options and concepts such as Peer IDs, Multiaddrs, and GossipSub.
Final notes
NAT hole punching
Peer-to-peer connectivity is inherently hard, which is why in this guide, all connections were on a local machine which significantly increases connection success rates.
On public networks where both browser peers are behind NAT, NAT hole punching success rates range around 80% depending on the network conditions and the types of NAT the peers are behind. The implications of this depend on the nature of your app. PubSub with GossipSub was designed to ensure delivery of messages without requiring a connection to the whole mesh. In other words, the GossipSub protocol was designed with sparsely-connected networks, where you are not connected to all other peers. So long as the browser peer can publish a message to at least one other peer, the message should propagate to all subscribers.
Another approach is to introduce a TURN server, however, TURN servers can be complex to run, bandwidth-heavy, and prone to abuse, since they relay all traffic.
If you want to experiment with this example over public networks, the bootstrapper peer needs to have a public IP so that it’s publicly reachable by all browser peers.
Ephemeral WebTransport multiaddr
Another challenge you may face is that the WebTransport multiaddr that is hardcoded into the js-libp2p configuration is ephemeral and valid for around 28 days (2 certificate hashes valid for 14 days each). One way to address this is using the DHT to resolve the Peer ID (which is stable and would be hard coded in the frontend) to its latest multiaddrs as done by the universal connectivity app.
Differences between js-libp2p in Node.js and browser
Connectivity between the browser and bootstrapper is constrained by supported transports of the browser and the specific libp2p implementation.
At the time of writing, js-libp2p in browsers supports:
- WebSocket: this works well and is broadly adopted by libp2p implementations, but requires the bootstrapper to have CA-signed TLS certificate and a domain name to work in Secure Contexts. Another disadvantage of Secure WebSocket is that it results in double encryption (TLS and Noise) with libp2p.
- WebTransport: Supported by Chrome, Firefox, Opera, and Edge, but not Safari.
- WebRTC: Supported by most browsers
- WebRTC-direct: Supported by all browsers that support WebRTC.
While js-libp2p in Node.js supports:
- WebRTC: this one is rather confusing because unlike WebRTC direct, it requires an additional circuit relay peer to forward SDP messages between the browser and the Node.js bootstrapper, making it infeasible for the Node.js peer to be the bootstrapper. WebRTC-direct solves this problem, however, at the time of writing it isn’t supported by js-libp2p (See tracking issue).
- WebSocket: as mentioned above, requires a CA-signed TLS certificate and a domain.
- TCP: not available in browsers.
Therefore, until WebRTC-Direct or WebTransport support is added to js-libp2p in Node.js, it’s much easier to use go-libp2p.
Next steps
As a next step, the universal connectivity app can be a great learning resource, as it expands on many of the concepts and patterns implemented by this guide, in addition to having two bootstrapper implementations in Rust and Go.
Optional: try the go relay
Go into the go-relay directory and install dependencies
cd bootstrapper
go get .
From the go-relay folder, run the following command to compile and run the bootstrapper:
go run .
This will compile and run the relay. It will also output the PeerID and the multiaddrs it’s listening on and should look similar to:
2024/05/21 17:43:43 PeerID: 12D3KooWMEZEwzATAoXFbPmb1kgD7p4Ue3jzHGQ8ti2UrsFg11YJ
2024/05/21 17:43:43 Listening on: /ip4/127.0.0.1/udp/9095/quic-v1/p2p/12D3KooWMEZEwzATAoXFbPmb1kgD7p4Ue3jzHGQ8ti2UrsFg11YJ
2024/05/21 17:43:43 Listening on: /ip4/127.0.0.1/udp/9095/quic-v1/webtransport/certhash/uEiAbhhQxJeJ6nAWdpB6NdSV4UPaTwEcy9eA76p22SoKyvg/certhash/uEiBTPUrn6BebjshxC80Uarqi4ZsMhrPPQNu2RDu1N4n_Ww/p2p/12D3KooWMEZEwzATAoXFbPmb1kgD7p4Ue3jzHGQ8ti2UrsFg11YJ
2024/05/21 17:43:43 Listening on: /ip4/192.168.3.174/udp/9095/quic-v1/p2p/12D3KooWMEZEwzATAoXFbPmb1kgD7p4Ue3jzHGQ8ti2UrsFg11YJ
2024/05/21 17:43:43 Listening on: /ip4/192.168.3.174/udp/9095/quic-v1/webtransport/certhash/uEiAbhhQxJeJ6nAWdpB6NdSV4UPaTwEcy9eA76p22SoKyvg/certhash/uEiBTPUrn6BebjshxC80Uarqi4ZsMhrPPQNu2RDu1N4n_Ww/p2p/12D3KooWMEZEwzATAoXFbPmb1kgD7p4Ue3jzHGQ8ti2UrsFg11YJ
Note that it’s listening on two interfaces (the loopback and the private network) and two transports: QUIC and WebTransport (which is on top of QUIC). QUIC can be used for connections to other go-libp2p relays, while WebTransport for connections from browsers. That means that QUIC isn’t strictly necessary, but it’s useful if you deploy another relay for resilience or leverage the DHT for peer discovery.
So why two certificate hashes? Self-signed certificates are valid for at most 14 days. So by convention, go-libp2p generates two consecutively valid certificates to ensure a smooth transition when a new certificate is rolled out.